Anthropic’s Claude Design Crafts Code-Powered Prototypes
Anthropic's new Claude Design tool uses advanced AI to create code-powered prototypes, slide decks, and interactive interfaces. The platform requires a subscription and careful monitoring of usage limits. Users can build custom design systems and generate designs ranging from basic wireframes to high-fidelity mockups, with features like 'tweaks' for granular control.
Anthropic Unveils Claude Design, A Visual AI Tool for Prototyping
Anthropic, the company behind the advanced AI model Claude, has launched a new visual tool called Claude Design. This tool builds on their most capable AI, Opus 4.7. It allows users to create more than just simple images.
Users can type in requests, and Claude Design generates initial drafts of websites, slide decks, and interactive prototypes. The process involves generating a draft and then refining it.
What sets Claude Design apart is its ability to produce code-powered prototypes. These aren’t just static pictures; they are interactive interfaces. Think clickable designs for websites, presentations, and even immersive experiences with integrated voice, video, 3D elements, and shaders.
This tool isn’t meant to replace popular design software like Figma. Instead, it aims to eliminate the time-consuming task of starting from a blank page.
Getting Started and Pricing Details
To begin using Claude Design, users need to visit claude.ai/design. Access to this visual tool is not free. It requires either a Pro or Max subscription plan from Anthropic.
For those who plan to use the tool extensively, the Max subscription is recommended. Many users find they quickly exhaust their usage limits, even after just a few attempts.
It’s crucial to monitor your usage, especially for Claude Design, as it has its own separate limits. Before starting, open the settings menu by clicking your icon, then selecting ‘Settings,’ and navigating to ‘Usage.’ Here, you can track your weekly Claude Design usage. This usage does not count towards your general Claude model limits, making it a distinct metric to watch.
The Importance of a Design System
Before creating any designs, setting up a ‘design system’ is highly recommended. This step can save significant time and effort later on.
A design system acts like a brand guide for the AI, ensuring that its outputs are consistent with your brand’s identity. This prevents the AI from making design choices that are off-brand.
Setting up a design system can be done with AI assistance. The goal is to provide Claude with detailed information about your brand’s colors, fonts, and overall style.
This helps the AI understand your brand’s visual language, leading to more accurate designs from the start. It also saves on AI usage by reducing the need for revisions.
Creating Your Design System with AI
To build your design system, you can use Claude’s chat feature. First, gather images of your existing brand. Then, prompt the AI to create a style or brand guide.
You can ask it to export this as a PDF for easy reference. This gives Claude the specific details it needs about your brand.
If you don’t have existing brand guidelines, uploading logos as screenshots can also work. Claude will then generate your design system, which may take a few minutes.
If Claude doesn’t recognize a specific font, you will be prompted to upload it. It’s best to upload all necessary font files to ensure the AI can perfectly replicate your brand.
Reviewing and Approving Design System Elements
After the initial generation, Claude will present elements that need review. You can approve or reject these items.
You might need to upload more font files if Claude indicates it can’t use a single font style. Providing as many brand assets as possible gives Claude all the context it needs to complete the work accurately.
Once you are satisfied with all the changes, click ‘Looks Good’ on each item. This confirms your approval and helps Claude avoid similar mistakes in the future.
While this review process might seem tedious, completing it now saves future editing time and AI usage. After approval, your design system is ready to be used for new projects.
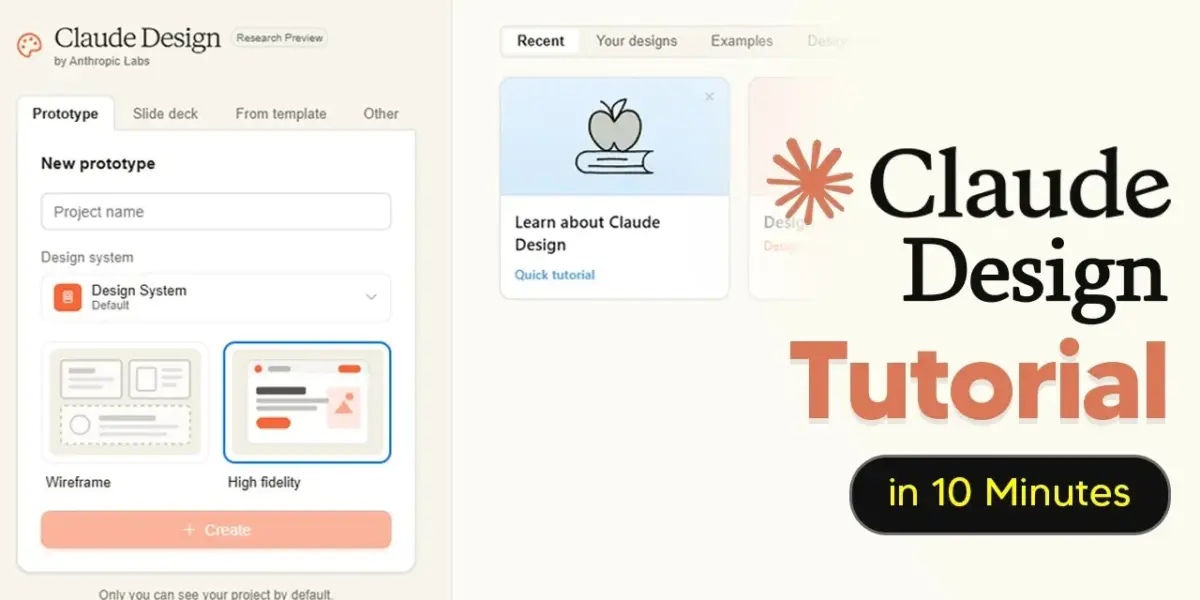
Building Prototypes: Wireframe vs. High Fidelity
Claude Design offers two main modes for creating prototypes: wireframe and high fidelity. A wireframe is a basic, low-detail layout. High fidelity designs are much more detailed and visually complete.
To start, you can create a landing page for an AI newsletter. After naming your project, Claude will ask clarifying questions to improve the design.
For beginners, it’s often best to start with a basic prompt. Claude will then verify your needs and ask further questions.
The Wireframing Process
The wireframe output provides a preview of the potential design before it’s fully rendered. This is useful for making detailed edits and changes early on. It’s also helpful if you plan to have a human designer work on the project or want to make extensive modifications yourself.
Wireframes allow for quick testing of ideas and can significantly improve the user experience. You can generate multiple layout options quickly.
If you dislike a particular section, the ‘Edit’ button allows for precise modifications. Instead of re-prompting and using more AI credits, you can directly edit text, colors, margins, and radii.
Advancing to High Fidelity Designs
Once you are happy with the wireframe, you can instruct Claude to turn it into a high-fidelity design. For example, you can say, “Turn the stat-led build into a high-fidelity landing page, no longer a wireframe.” Keep an eye on your usage as the project progresses, as this step can consume significant resources.
The result can be a fully realized, visually appealing landing page. Claude Design has shown effectiveness in translating wireframes into polished designs, incorporating elements like logos and correct layouts. You can still make further adjustments using provided buttons or the edit feature for granular control.
Advanced Features: Tweaks and Animations
Claude Design includes a ‘Tweaks’ feature, which allows for on-the-fly design changes without re-rendering the entire project. This saves AI tokens and allows for exploring variations. By adding prompts like “Add tweaks for as many aspects of this effect as you can,” you can enable options to change hue, iridescence, glow, or noise.
This feature is also seen in examples like a construction kit calculator, where users can adjust aspects like roundedness or sharpness. Tweaks offer a way to make granular edits using interactive buttons rather than costly text prompts. Claude Design can also create animations, though these are very computer-intensive and can quickly deplete usage limits.
Exploring Claude Design’s Built-in Skills
Claude Design has a variety of built-in skills that enhance its capabilities. Accessing these skills, found under the ‘Design System’ section, reveals formats Claude excels at. These include animated video creation, interactive prototypes, slide decks, and front-end design.
Other useful skills are wireframing, PowerPoint generation, and PDF creation. Using these pre-defined skills before starting a project ensures a higher quality output. Always ensure your design system is selected when creating anything within Claude Design to maintain brand consistency.
Source: How To Use Claude Design – Tips And Tricks Most People Missed (YouTube)
Related Articles


Anthropic’s Opus 4.7 Excels in Enterprise Tasks, Not Everyday Use
Anthropic's new Opus 4.7 AI model shows major gains in areas like document analysis and long-term planning, primarily benefiting enterprise users. However, for everyday individuals, the model may not feel like a significant upgrade due to trade-offs and increased effective costs.


Claude AI Runs Tasks While You Sleep
New AI desktop apps from Google and Claude offer enhanced features, with Claude's "Routines" allowing scheduled AI tasks to run automatically in the cloud. This means AI can work for you even when your computer is off, automating tasks like meeting summarization and freeing up your valuable time.

Claude Opus 4.7 Debuts With Mixed Results and Controversy
Anthropic's new Claude Opus 4.7 model has launched, but not without controversy. While showing improvements in some areas like knowledge work, it exhibits unexpected flaws and deliberate limitations in others, such as cybersecurity and complex reasoning. The model's adaptive thinking and potential compute constraints have raised user concerns, even as Anthropic pushes forward in a highly competitive AI market.